Friday 28 December 2012

Rainbow Cupcakes

I love rainbow cake. Of course, if you know me IRL, or if you've been reading this blog long enough, you'll already know that! I love baking with bright and vibrant colours, and rainbow cake soon become a “signature dish” for me. I wanted to share my recipe for rainbow cupcakes, as I think they are fab, but also because I often use this recipe as a base recipe when making/decorating birthday cupcakes (which will be popping up on this blog in the near future!)


Ingredients:

For the cupcakes:
200g butter or margarine
200g caster sugar
2 medium eggs
200g self raising flour
1tsp vanilla extract
Food colourings in red, yellow, green, blue and purple (or at least red, yellow and blue – you can mix the other colours if you need to!)

For the buttercream:
100g slightly salted butter
200g icing sugar
Vanilla extract, to taste
A little milk, if necessary
Edible glitter, to decorate

Prep time: 30 minutes
Cook time: 12 – 15 minutes
Makes 18 cupcakes


  1. Preheat the oven to gas mark 5 and line a bun tray with cupcake cases.
  2. Beat the margarine and sugar together until light and fluffy, then beat in the eggs, one at a time. Tip the flour into the bowl along with the vanilla extract, and fold into the mixture until just combined. (Be careful not to over mix here, as you'll be doing a lot of mixing when you add the colours!)
  3. Split the mixture into 5 even portions, then use your food colourings to colour the batter red, yellow, green, blue and purple. I use Sugarflair paste food colourings, as I find you can get a really vibrant colour without using too much. I'd be wary of using liquid colourings, as in order to achieve a vibrant colour you will have to use a lot of liquid, which could effect the taste and texture of your cakes.
  4. Place half a teaspoon of purple batter into the bottom of each cupcake case, and spread this evenly across the bottom of the case with the back of a spoon. Next, add half a teaspoon of the blue batter on top of the purple batter, smoothly gently with the back of the spoon. You want to cover the whole of the purple layer, but not mix it in, so try not to put too much pressure on the cake – just flatten it down as quickly and lightly as you can. Repeat the process adding half a teaspoon of green batter next, then half a teaspoon of yellow, finally adding half a teaspoon of the red batter.
  5. Bake for 12-15 minutes until firm and springy to touch. Remove from the oven and place on a wire rack to cool completely.
  6. Meanwhile, beat your butter, icing sugar and vanilla extract together to make your buttercream, adding a little milk if necessary to achieve the desired consistency. Once your cupcakes have cooled, pipe swirls of buttercream onto the top of these, and then decorate with a sprinkling of edible glitter!

Happy Thoughts
x

Wednesday 26 December 2012

Christmas Leftover Loaf

Happy Boxing Day! I hope you've all had a wonderful few days, whether you celebrate Christmas or not.

I know it's not Friday, nor is this a Cake'n'Bake Wednesday recipe, but I couldn't let the day slip by without sharing my Christmas leftover loaf with you all. You see, Boxing Day means many things to many people - for some it's about relaxing after zooming around on Christmas day visiting all their loved ones, for others it's about crowding around the telly to watch the football, but for us, it's about leftover turkey sandwiches.


So this is my take on a left-over turkey sandwich - the perfect Boxing Day recipe. This is also my last Christmas recipe of the year!  (Sad face)

Ingredients:
For the dough:
300ml warm water
1 tbsp brown sugar
2 tbsp olive oil
7g sachet of dried yeast
500g strong white bread flour
Pinch of salt
A little beaten egg, to glaze

For the filling:
Any Christmas leftovers you need to use up! I used turkey, stuffing and cranberry sauce, but you could also use chopped up bits of leftover veg, pigs in blankets, whatever you fancy!

Prep time: 1 hour 45 minutes
Cook time: 35-40 minutes
Makes 1 loaf
  1. Place the water, sugar, olive oil and yeast into a jug and stir well. Leave this to one side for a few minutes. 
  2. Meanwhile, sift the flour and salt into a large mixing bowl and create a well in the centre. Tip the yeast mixture into the centre of the well, then work the flour into the liquid mixture using a fork.
  3. Once the ingredients have combined to form a rough dough, tip the contents of the bowl out onto a clean, dry work surface. Knead by hand for 7-10 minutes, until all of the flour is incorporated and you have a soft, springy dough.
  4. Place the dough into a large oiled bowl, cover with clingfilm and leave in a warm place for one hour, until doubled in size.
  5. Whilst the dough is proving, prepare your filling. Chop the turkey into small chunks, and soften the stuffing with a little warm water if desired.
  6. Tip the dough out onto a lightly flour surface and knock back. Knead lightly for 3-5 minutes, then roll out to around 1 inch thick. Spread or sprinkle your filling ingredients over the dough (like a pizza) then roll the bread up like a swiss roll. Tuck the ends underneath the loaf and pop it into a well-greased loaf tin. Leave to rise, uncovered, for a further 30 minutes. The dough should double in size again.
  7. Pre-heat the oven to gas mark 5, then brush the top of the loaf with a little beaten egg. Bake for 35-40 minutes until golden brown all over. Slip the bread out of tin and tap on the bottom - if it sounds hollow then it's done, if not pop it back in the oven for a further 5-10 minutes to finish off.
  8. Leave the loaf to cool, then cut into thick slices and enjoy!
Happy Thoughts
x

Friday 21 December 2012

Sage and Onion Sausage Rolls

I actually feel a little guilty about posting this recipe, as it's a complete cheat. These sausage rolls are so quick and simple, but no one would ever know that because of the way the taste!


Ingredients:
1 medium onion
8-10 sage leaves
A pinch of black pepper
350g pack of good quality sausage meat
1 pack of ready rolled puff pastry
A little beaten egg, to glaze

Prep time: 10 minutes
Cook time: 25-30 minutes
Makes two large sausage rolls

  1. Remove the pastry from the fridge, line a baking tray with greaseproof paper and pre-heat your oven to gas mark 5.
  2. Quarter the onion and pop this into the blender with the sage leaves and pepper, then blend until very finely chopped.
  3. Tip your sausage meat out into a bowl, the tip on the sage and onion. Mix these together by hand until the sage and onion is evenly distributed.
  4. Unwrap the pastry sheet, and cut this in half. Place half of the sausage meat down the centre of each pastry sheet, and wrap or plait the two edges of the pastry around the sausage meat to seal it in - make sure there are no gaps, you don't want all the lovely juices escaping! 
  5. Brush the sausage rolls with the beaten egg, then pop them in the oven for 25 -30minutes, until golden brown all over.
  6. Once cooked, allow the sausage rolls to cool slightly before cutting into slices. Serve hot or cold - they are good either way!
Happy Thoughts
x

Wednesday 19 December 2012

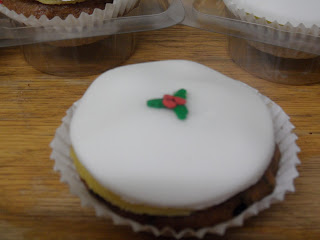
Cake'n'Bake Wednesday: Christmas Cake Cupcakes


Here is the third and final entry of the cupcake selection box I made for Cake'n'Bake Clubs' "Fabulously Festive" meeting last December. 


This recipe is perfect for last minute Christmas cakes. Most Christmas cake recipes require a lot of time and planning in advance, but this one only takes around an hour and is just as scrummy!.


Prep time: 30 minutes:
Baking time: 20 minutes
Makes around 12 cupcakes

90g margarine
250g dried mixed fruit
Zest and juice of 1 orange
90g soft light brown sugar
100ml Guinness (plus extra for glaze)
1tsp bicarbonate of soda
2 small eggs
150g plain flour
1 heaped tsp mixed spice 
250g golden marzipan
250g ready to roll icing
Holly and berry sprinkles, to decorate
  1. Preheat the oven to gas mark 4 and line a bun tray with cupcake cases. 
  2. Chop the margarine into cubes and place this in a large saucepan, with the mixed dried fruit, the zest and juice of the orange, the light brown sugar, and the porter. Begin to heat the ingredients slowly, stirring consistently until the butter melts. Once the butter has melted increase the heat under the pan until the mixture comes to the boil. Reduce the heat and allow the mixture to simmer for 15 minutes.
  3. Remove from the heat and allow the mixture to cool in the pan for at least 10 minutes, then stir in the bicarbonate of soda. The mixture will start to foam up, this is supposed to happen!
  4. Beat the eggs in a separate bowl and then stir them into the mixture a little at a time.
  5. Sift the flour and mixed spice into the pan and mix well until completely combined.
  6. Place a heaped teaspoon of the mixture into each baking case, then bake in the oven for around 20 minutes
  7. Remove the cupcakes from the oven and allow to rest in the tine for 5 minutes before turning onto a wire rack to cool.
  8. Once cool, roll out the golden marzipan to around 5mm thick, then use a cutter to cut small circles. Brush a little bit of the leftover Guinness on top of the cupcake, then place a marzipan circle on top. Once all the cupcakes are covered in marzipan, dust your work surface with icing sugar and roll out the ready to roll icing, again to around 5mm thick. Repeat the process: cut out circles, brush a little Guinness onto the marzipan and then place the icing round on top of the marzipan, pressing down slightly to make sure they stick together.
  9. Decorate with sprinkles or toppers as desire, then take a bite out of one of them - chefs duty :-)

Happy Thoughts
x

Friday 14 December 2012

Cranberry Jam

I've never made cranberry sauce or cranberry jam or cranberry jelly before, but I decided to make home-made Christmas hampers for my friends and family this year and thought that some sort of cranberry preserve deserved to be included. I'm calling it a cranberry jam, as it has a thick, jam-like consistency.


I used the recipe on the punnet of cranberry, with the addition of a couple of tangerines to make it even more Christmassy!

Ingredients:
2 tangerines
100 ml water
100g sugar with added pectin
350g fresh cranberries

Prep time: 5 minutes
Cook time: 30 minutes
Makes 2 medium (200gish) jars

  1. Grate the zest of the tangerines into a saucepan, and then squeeze in the juice. Add the water and the sugar and turn on the heat, stirring until the sugar has dissolved.
  2. Add the cranberries to the pan and allow the jam to simmer for around 30 minutes, stirring occasionally to prevent the jam from catching on the bottom. 
  3. Meanwhile, sterilise the jars and lids by washing them in warm soapy water, rinsing in hot water and then baking on a low heat until completely dry.
  4. After 30 minutes, the jam should have reduced to a nice, thick mixture. It will continue to thicken as it cools.
  5. Carefully remove the jars from the oven, and spoon the cranberry jam into them - it's really important to be careful here as both the jar and the jam will be very, very hot! Place the lids on the jars and leave to cool to room temperature before placing in the fridge.
  6. Keep refrigerated and consume within 6 weeks.


Happy Thoughts
x

Wednesday 12 December 2012

Cake'n'Bake Wednesday: Gingerbread Cupcakes

Ho Ho Ho! Here's the second variety of festive themed cupcakes included in my cupcake selection box for the December 2011 Cake'n'Bake meeting.


Following that meeting, I think that "ginger" can officially be classified as the flavour of Christmas 2011 - so many of us went for a recipe containing ginger!


Prep time: 15 minutes
Baking time: 15-18 minutes
Makes around 12 cupcakes


Ingredients:
150g margarine
150g soft light-brown sugar
2 medium eggs
150g self-raising flour
2 heaped teaspoons ground ginger
small pinch of cinnamon
1 tbsp milk


For the icing:
100g soft cream cheese
50g vegetable shortening
250g icing sugar
1 tbsp lemon juice
Sprinkles, for decoration


  1. Preheat the oven to Gas Mark 4, and line a bun-tray with cupcake cases
  2. Beat the margarine and sugar together until light and fluffy. Add one of the eggs, and beat well until you have a creamy batter, then fold in half of the flour and all of the spices. Repeat with the remaining egg and flour, then finally stir in the milk.
  3. Place a heaped teaspoon of the batter into each cupcake case (you may find you have a little leftover...) and bake in the centre of the oven for 15-8 minutes, until golden brown and springy to the touch. Remove from the oven and place on a cooling rack.
  4. Once cooled, create the icing by mixing together the cream cheese and shortening. Beat in the icing sugar a little at a time, followed by the lemon juice. Be careful not to over-mix this one, as the cream cheese and lemon juice can make it quite runny - mix until all the ingredients are combined and you have a nice consistency, but not much more than than! If yours does get a little runny, just pop it in the freezer for 5 minutes to firm it up a bit. :-)
  5. Pipe or spread the icing onto the cooled cupcakes, and decorate with sprinkles as desired.

Happy Thoughts
x

Friday 7 December 2012

Chocolate Christmas Pudding Muffins

I'm going to let you in on a little secret - there is  type of cake I really hate. I know. It's sacrilege! Completely and utterly against my religion! I should be banned from the bake-blogging world immediately!! But it's true, I really can't stand fruit cakes. That includes fruit puddings too, so Christmas cake and Christmas pudding are not my friends. You see, I have a passionate dislike for raisins, currants and sultanas, and as fruit cakes contain an abundance of those things, we've never seen eye to eye. Or cake to mouth. So when I wanted to make some mini Christmas pudding for a Christmas party a few years back, I had to come up with a suitable alternative. I went with chocolate chip muffins. It worked for me!!


These muffins pre-date my blogging days, but they got a lot of complements so I wrote the recipe down in a notebook. Flipping through that notebook made me quite nostalgic, and I found a couple of SWEET recipes to share in the near future! I think I'm going to make some mini - muffin versions of these this Christmas, I'll post the photos below when I do!

Ingredients:

For the muffins:
100g soft brown sugar
150g self raising flour
3 heaped tbsp cocoa powder
100ml vegetable oil
50ml milk
2 medium eggs, beaten
100g chocolate chips

To decorate:
150g icing sugar
A few drops of water
50g green ready-to-roll icing
25g red ready-to-roll icing


Prep time: 10 minutes
Cook time: 15-20 minutes
Makes 8 muffins


  1. Preheat the oven to gas mark four and grease a muffin tin really well.
  2. Tip your sugar, flour and cocoa powder into a mixing bowl, then stir in the oil, milk, and beaten eggs until all the ingredients combined to form a smooth batter. Fold in the chocolate chips.
  3. Spoon the batter into the muffin tin, filling each hole 3/4 full. Bake for 15-20 minutes until firm but springy to touch. Leave the muffins to cool completely in the tin.
  4. Whilst the muffins are cooling, make your holly leaves and berries with the fondant icing. For the leaves, I rolled out the green icing and used a sharp knife to cut out a holly leaf shape, which is why mine are all uneven! You could also use a cutter, if you have one! For the berries, I simply rolled up small pieces of the red icing in my hands.
  5. Once cool, remove the muffins from tin. You'll be serving the muffins bottom up, so you may need to cut a little away from the top of each muffin to make sure they are level.
  6. Eat the cut off bits (this step is very important!)
  7. Put a wire rack or cooling rack over a tray or sheet of greaseproof paper (it's could get messy during the next few steps!) then place your muffins, bottom up, on top of this.
  8. Now it's time to make the icing. I made mine ever so slightly too runny, which is ever so easy to do, so always best to err on the side of caution. Pour the icing sugar into a bowl, then stir in the water 1tsp at a time until you have a spreadable, but still thick icing. I know it's tempting to add the water more than 1tsp at a time, but trust me - this kind of icing goes from solid to runny in 2 seconds flat. Be patient!
  9. Once your icing is of the desired consistency, spread a little over the top of each upside-down muffin, letting it go over the edge and start to dribble down the sides. If, like me, you made your icing too runny, the icing will probably stream down the sides, rather than dribble, and you'll be pleased you placed that greaseproof paper underneath to catch all the icingy mess!
  10. Place your holly leaves and berries on top of the icing, then leave to set.
  11. Serve with a cup of tea and some Christmas cheer!
Happy Thoughts
x

Wednesday 5 December 2012

Cake'n'Bake Wednesday: Chocolate Peppermint Cupcakes


It was a fairly obvious choice of a theme for December 2011, but the only one we ever could really use: "Fabulously Festive" - and so Christmas month at The Princess and the Cake continues on Cake'n'Bake Wednesday, too! I chose to make some festive cupcake selection boxes which included three types of cupcakes: Chocolate Peppermint, Gingerbread and Christmas Cake. Here's the first recipe in the trio of delights I created - the Chocolate Peppermint variety!


I was a bit cheeky this time round, and decided to do a whole bunch of baking all in one go for Cake'n'Bake Club, but also for friends, family and colleagues' Christmas pressies! I ended up making 24 of each variety, so I've halved the quantities below, however don't be surprised if you end up with slightly more mixture than required for 12 cupcakes (as I recall I had a little bit left over for each!)


Prep time: 15-20 minutes
Baking time 12-15 minutes
Makes around 12-14 cupcakes 

Ingredients:
65g cocoa powder
100g plain flour
pinch of salt
1tsp bicarbonate of soda
1tsp baking powder
60ml water
60ml milk (plus up to 60ml more for the filling/frosting, if required)
75g butter or margarine
150g granulated sugar
1 medium egg
100g box of "peppermint thins" (After Eights)
150g vegetable shortening
250g icing sugar
Peppermint flavouring, to taste
Sprinkles to decorate

  1. Preheat the oven to gas mark 5 and line a bun tray with cupcake cases.
  2. Sift the cocoa powder, flour, salt, bicarbonate of soda and baking powder together into a bowl and put to one side. In a second bowl or jug, mix together the water and 60ml of the milk. In a third (and final - I promise!) bowl, beat together the butter and sugar until fluffy, then add the egg and beat until combined to form a smooth batter.
  3. Fold half of the dry ingredients mixture into the batter, then add the milk and water, followed by the remaining dry ingredients, stirring until combined between each addition.
  4. Spoon a heaped teaspoon of the mixture into each cupcake case and bake for 12 - 15 mins until firm and spongy. Remove from the oven and allow to rest in the pan for 5 minutes before turning out onto a wire rack to cool completely.
  5. Whilst the cupcakes are cooling begin to prepare your filling. Bring a pan of water to the boil, then reduce the heat as low as it will go. Put the peppermint thins into a glass bowl and rest this in the pan of boiling water, being careful not to get any water into the bowl. Stir this continuously until the mints have melted. They will probably form a gloopy ball at this stage, don't worry! Keeping the bowl in the hot water, stir milk into the chocolate a little at a time until you reach the desired consistency (it should be a ganache-like mixture, smooth enough to pipe but not too runny). Place this into a piping bag and put to one side to cool slightly.
  6. Cut a well into the centre of each cupcake, pipe a generous amount of the chocolate peppermint ganache into the well, then replace the top of the cupcake. (Don't worry if these stick up a little, that will be hidden by the frosting!)
  7. Once the cakes are completely cool, make your frosting by mixing the icing sugar into the shortening a little at a time. If your frosting is too stiff, add a little milk until it reaches the desire consistency, then add a few drops of peppermint flavouring. Spread or pipe the frosting on top of the cupcakes, then finish with sprinkles.
  8. Take a big bite of one of them, just to make sure they are super tasty ;-)


Happy Thoughts
x