Sunday 30 June 2013

Strawberry Frozen Yogurt

Apparently, it's tennis season, and that means that all bloggers are obliged to post at least one recipe which uses strawberries and or cream - so here's mine :-) Strictly, that's not true. The only reason I even know it's tennis season is because all of the foodie blogs I follow are posting yummy strawberry recipes all over the place. This frozen yogurt was actually made for the following reasons:
  • I needed a recipe to post for Ice-Cream Sunday, and
  • I had some yogurt I needed to use up, and
  • My housemate bought a huge punnet of strawberries and asked me to help him devour them


So, here's a super simple recipe for strawberry frozen yogurt! I made this one in my ice-cream machine, but you could also pop in in the freezer, if you're willing to take it out and whisk it every half an hour until it is the right consistency! The merringue pieces are optional, but delicious. Embrace the merringue, people.

Ingredients:
100g fresh strawberries
200g Greek yogurt
3tbsp caster sugar
3 mini meringue shells (plus extra to serve)

Prep time: 30 minutes
Serves: 2


  1. Prepare your ice-cream machine as per manufacturers instructions.  For me, this involves popping it in the freezer overnight.
  2. Remove the stalks from the strawberries and pop these into a blender. Wizz them into a puree.
  3. Pour the strawberry puree, yogurt and sugar into a bowl and mix until combined. cover the bowl with clingfilm and pop in the freezer for 15 minutes to chill (this stops it from freezing to the sides of your ice-cream machine. )
  4. Once chilled, get your machine running and pour the chilled yogurt in. Leave it running for around 10 minutes.
  5. Crumble the meringue shells into the frozen yogurt,  and let it continue to stir for another minute or so.
  6. Serve immediately.  Tennis is optional. 


Happy Thoughts
x

Friday 28 June 2013

Sweet Potato Cake


A little while ago whilst browsing recipes online, I came across this recipe for a gluten-free lemon drizzle cake which was made using mashed potato. Yep, mashed potato. I thought it was interesting, so naturally had to give it a go!


My version of the cake used sweet potato and fewer lemons, so the cake ended up with a lovely subtly sweet flavour.  I cheated and used gluten-free flour instead of almonds, but it still worked. I thought the cake was a little dense, but it was very moist and the marshmallow fluff topping just, well, topped it! :-) Needless to say, this one didn’t last long!

Ingredients:
350g sweet potato
200g margarine
200g caster sugar
4 medium eggs
1 lemon
225g self raising flour
1 tub of marshmallow fluff


Prep time: 35-40 minutes
Cook time: 40-45 minutes
Serves: 10-12

  1. Peel and dice the sweet potato, then boil it in water for around 10-15 minutes, until soft. Drain and put to one side to cool slightly.
  2. Preheat the oven to gas mark 3 (160 degrees) and grease and line a cake tin.
  3. Once cooled, tip the potatoes into a large bowl and beat with an electric mixer until smooth.
  4. Beat in the margarine and sugar until the mixture is light and fluffy. Add the eggs one at a time, beating between each addition.
  5. Zest the lemon, and mix this into the cake batter along with the juice of half of the lemon.
  6. Sift and fold in the flour, until the mixture has combined. Pour into the prepare cake tin and level the top. Bake for 40-45 minute, until golden brown and firm to touch. If unsure, just poke a skewer into the centre of the cake - if it comes out clean and dry, you're done!
  7. Allow the cake to cool in it's tin for 5-10 minutes before turning out onto a wire rack to cool completely.
  8. Once cooled, spread or pipe marshmallow fluff on to the top of the cake.
  9. Serve and enjoy!


Happy Thoughts
x

Friday 21 June 2013

Maltesers Tiffin

As I write this post, I'm having a tiffin party for one! For father’s day this year, I decided to make my dads a tiffin selection box each. Thing is, a selection box requires a selection, and so three different tiffins were made: malteser, Cadbury's fruit and nut, and (everyone’s favourite) white chocolate macadamia. I'm going to try to stagger the recipes so that I don't need to rename this blog "The Princess and the Tiffin", but here's the first of the three!


Prep time: 5-10 minutes
Chill time: 1 hour
Makes 20 pieces

Ingredients :
400g milk chocolate
90g butter
3tbsp golden syrup
200g malted milk biscuits
100g Maltesers

  1. Start by lining a square brownie tin (20x20cm) with clingfilm or greaseproof paper.
  2. Break the chocolate into chunks, then pop 200g into a large microwavable bowl. Add the butter and golden syrup, and microwave on a medium heat in 20 second blasts, stirring between each blast, until the ingredients have melted together to form warm, gooey, chocolately loveliness. Pop this to one side to cool slightly.
  3. Put your biscuits into a food processor and wizz until they are mostly crumbs (a few small biscuity lumps is fine!!)
  4. Add the biscuit crumbs and the maltesers to the melted chocolate mixture, and stir until everything is coated.
  5. Tip the mixture into the prepared tin and flatten down with the back of a spoon. Pop this in the fridge to chill for 5 minutes, and then move on to the topping.
  6. Melt the remaining chocolate, and then carefully pour over the tiffin. Use the back of a clean spoon to spread this evenly over the tiffin, then return the tin to the fridge to set for at least 1 hour.
  7. Once set, turn the tiffin out of the pan onto a chopping board and cut into 20 squares.
  8. Taste one, and come up with a sneaky plan to hide them from everyone else :-)

Friday 14 June 2013

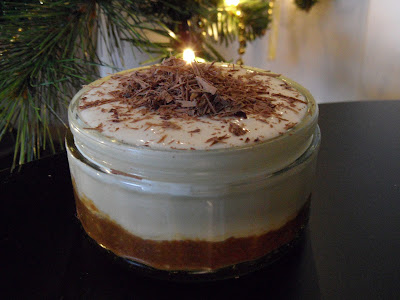
Individual Bailey's Cheesecakes (and a very special birthday...)

This post is dedicated to my Mum. The lady who taught me how to bake (and so much more than that!!) The lady who loves Bailey's, and loves cheesecake. Today is my Mum's birthday, so this recipe is especially for her.

Mum and I, circa 1988


There's actually a funny story around this post... you see, although I now live in Cambridge, I grew up in Derby, and that's where my Mum still lives. I only get to go back to Derby 3 or 4 times a year, but Mum's a real opportunist, so whenever I'm back she puts me to work. This could be sewing felt onto jumpers for some festive fun, or adding glitter accents to figurines to make decorations for her Disney Christmas tree (yes, Mum has a Disney Christmas tree, in addition to her traditional Christmas tree. Well, what did you expect!?), but usually she puts me to work in the kitchen. And her favourite thing to get me working on is cheesecake.

So, there was one such weekend I was back in Derby, and I was tasked with making a Bailey's cheesecake for Mum to take into her office on her last day of work before starting a new job. So I set to work, giving just one condition: when Mum got to work the next day and put her cheesecake onto a serving plate there, she would take a photograph for me to use on the blog. She agreed, and an epic, 10-12 slice cheesecake filled with chocolate and Bailey's swirls was created. I quickly jotted down the ingredients and quantities that I'd used, and came back to Cambridge. A few days later, I text Mum to ask how the cheesecake went down, and if she could send me the photos. She replied to say it was really yummy, but she forgot to take a photo. Head, meet desk.

I could have just made another Bailey's cheesecake and taken a photo of that, but I'm strictly tee-total these days, and even when I did drink I didn't like Bailey's, so I couldn't justify making a cheesecake that wouldn't be eaten just to take a photo. I love my blog and my readers, really, I do, but that is a bit too much for me! So the recipe got put on the shelf until the opportunity next arose (i.e. I was next at Mum's house and she wanted another Bailey's cheesecake!!)

Anyway, getting back to the point... the opportunity next arose at Christmas. I couldn't make a whole Bailey's cheesecake as it wasn't completely family friendly. But, I'd recently ventured into the realms of individual desserts with my Individual Malty Malteser Cheesecakes, so I knew just what to do.


Individual Bailey's Cheesecakes!! OK, I think I've prattled on long enough now so just one last thing to say before I get on with the recipe:


Ingredients:
30g melted butter
6 digestive biscuits
60ml double cream
60g cream cheese
30g icing sugar
1tbsp baileys
Grated chocolate, to decorate

Prep time: 15 minutes
Chill time: at least 1 hour
Makes 2 individual Cheesecakes


  1. Melt the butter in the microwave, then pop to one side to cool slightly.
  2. Put the digestive biscuits into the blender, and whizz until they resemble fine crumbs. Tip the crushed biscuits into the melted margarine and stir until evenly coated. Split the biscuit mixture evenly between the two ramekins, and press down with the back of a spoon. Pop in the fridge to set whilst you prepare the filling.
  3. Pour the cream into a small bowl and whisk until thick and pillowy. Add the cream cheese, icing sugar, and Baileys and whisk until all combined to a thick and creamy mixture. 
  4. Spread half of the mixture over each biscuit base. Sprinkle a generous amount of grated chocolate over each cheesecake, then pop back in the fridge until ready to serve!
Happy Thoughts
x

Friday 7 June 2013

"99 with Cake" - Ice Cream Cone Cupcakes


Since the sun has decided to show its beautiful, shiny, happy face this week, I thought it would be fun to post my recipe for these cute little ice-cream cone cupcakes. I made these for a Marie Curie Tea Party my friend Joy and I hosted a couple of years back, and they went down very well indeed!


I couldn't find any flat bottomed cones, so I bought normal cones and very carefully sawed off the bottoms to make them stand... this meant I had to bake the cupcakes separate to the cone, but it worked well :-)

Ingredients:
For the cupcakes:
100g margarine
100g caster sugar
1 medium egg
2tbsp milk
1tsp vanilla extract
100g self-raising flour

For the butter cream:
300g butter
600g icing sugar
2 tsp vanilla extract
a little milk, if needed

To decorate:
12 ice cream cones
3 cadbury flakes (full sized), or 12 mini flakes

Prep time: 30 mins
Cook time: 15 - 20 mins
Makes 12


  1. Preheat the oven to gas mark 4 (or 180) and line a bun try with cupcake cases.
  2. Beat together the margarine and sugar until light and fluffy. Beat in the egg, milk and vanilla extract until well combined. Sift in the flour and fold in until the mixture is smooth (and delicious - try not to eat too much just yet!)
  3. Spoon the batter into the cupcake cases and bake for 15 - 20 minutes, until golden brown and springy when touched. Leave the cakes to one side to cool.
  4. While the cakes are cooling, prepare your butter cream. Beat the butter until soft, then mix in the icing sugar and vanilla. If you find your butter cream is too stiff, add a teeny tiny splash of milk, stir it in, and repeat until you have the desired consistency. You need this butter cream to be fairly robust if you want to make it look ice-creamy! Spoon the butter cream into a piping bag fitted with a large star nozzle (I used Wilton 1M) and pop to one side.
  5. Now the tricky part... if you're using flat bottomed cones and mini flakes - well done you! You are much cleverer than I am, and can move to the next step. If, like me, you have pointy bottomed cones and standard sized flakes, I hope that, unlike me, you have a steady hand! Use a serrated knife to carefully cut off the end of each cone, so that the cone can stand flat. Next, chop the flakes into 12 mini-pieces. Try not to crumble them into dust in the process. (MUCH easier said than done!!)
  6. Now for the assembly. Remove the cooled cupcakes from their cases, and pop each one into your prepare ice-cream cone. Pipe a big swirl of butter cream on top of each (think Mr. Whippy!) and then pop a flake into the icing to finish.
  7. Eat them quick - you wouldn't want the ice-cream to melt ;-)

Happy Thoughts
x

Wednesday 5 June 2013

Cake'n'Bake Wednesday: Champagne Victoria Sponge

Our June 2012 meeting was the day after the double bank holiday for the Queen's Diamond Jubilee, so we thought it was only fair to thank our ma'am for the extra day off work by paying homage to her in baked form. When tasked with baking a cake to celebrate Britishness and the Queen's Diamond Jubilee, for me it could only ever have been a Victoria Sponge. A special, spruced up for a party kind of Victoria Sponge. So I decided to sandwich some home made strawberry and champagne jam with some champagne flavoured butter cream in between two layers of deliciously light almond sponge.

I also entered this recipe into a couple of Jubilee baking competitions, and whilst I wasn't a prize winner in the Times' Jubilee Bake Off, I did get 1st prize in the Natural Selection Foods Jubilee Baking Competition


Strawberry and Champagne Jam

Ideally the jam should be made at least a day in advance so that it has time to set, however to save time it can be made in advance. The jam will keep in the fridge for 6-8 weeks (if it lasts that long!)

Prep time: 10 minutes
Cook time: 45 minutes to 1 hour
Makes two medium sized jars (around 400g)

Ingredients:
300g fresh British strawberries
250g jam-making sugar (sugar with added pectin)
1 tbsp unsalted butter
100ml pink champagne
1 tsp lemon juice


  1. Place a heavy-based saucepan on the hob on the lowest heat. Wash, hull and chop the strawberries into small pieces, then add these to the pan with the sugar, butter and champagne. Gently stir until the butter has melted and the sugar has dissolved, then leave the jam to cook on the lowest heat for a while, stirring regularly.
  2. Meanwhile, place a saucer into the freezer to use later when it come to test whether or not the jam will set.
  3. Once the jam begins to bubble and simmer, add the lemon juice. The liquid should have reduced and thickened slightly. After around 45 minutes, test the jam for set by taking your saucer from the freezer and dropping a teaspoon of jam onto it. After 30 seconds on the saucer the jam should be set - if not add a little more lemon juice and cook for a little longer.
  4. Once the jam is ready, remove from heat and pour into sterilised jars. Leave to cool completely before placing in the fridge to set overnight. Removed from the fridge 30 minutes before serving to allow the jam to return to room temperature.

Champagne Victoria Sponge

Prep time: 20 minutes
Cook time: 30-35 minutes
Makes 18 slices

Ingredients:
600g margarine
600g caster sugar
6 large free range eggs
50ml milk
A few drops of natural vanilla extract
600g self raising flour
1tsp baking powder


For the filling:
250g unsalted butter
500g icing sugar
1 tbsp milk
A few drops of champagne flavouring (to taste)
4-5 tbsp strawberry and champagne jam
Extra icing sugar for dusting.

  1. Preheat the oven to Gas Mark 5 / 190 Degrees, and grease and line two 9" springform cake tins
  2. Beat the butter and sugar together in a large bowl until light and fluffy. In a small bowl or jug, beat together the eggs, milk and vanilla extract and put to one side. Sift the flour, almonds and baking powder together into another bowl. Beat a third of the wet mixture into the butter and sugar, then fold in a third of the dry mixture. Continue in the order until all of the ingredients have combined to form a smooth batter. 
  3. Divide the batter between the two prepared cake-tins and level with the back of a spoon. Bake for 30-35 minutes until golden brown and springy to the touch. Allow the cakes to cool in their tins for 5 minutes before turning out onto a wire rack to cool completely.
  4. Whilst the cakes are cooling, prepare the butter cream. Beat the butter, icing sugar and milk together until smooth and creamy, then add a little champagne flavouring at a time until you reach your desired taste. Put the butter cream into a piping bag fitted with a large star shaped nozzle, and place in the fridge until ready to use.
  5. Once the cakes have completely cooled, assemble the sponge. Place one of the sponge layers onto a serving plate, and spread the jam over this. Pipe the butter cream on top of the jam in swirls, and then place the second sponge gently on top of this. Dust the cake with icing sugar to finish.

Happy Thoughts
x